


FRIDAY
FEBRUARY 6,
2015
9:00 am until
4:00 pm
RIKI SCHUMACHER
TIMELESS BEAUTY
$145
all-day class

Join me for a fabulous
metals technique workshop! So many
skills are sprinkled in. You will
be designing and constructing a custom watchband. A combination of mixed metals
may be used, as well as stampings, then cold connect all pieces together for
fabulous layered look.
I have always loved
watches, and used to make beaded ones many moons ago, they are really what
launched me into jewelry. So I’m
super excited about this, and feel these are really unique! There are a ton of
metal techniques involved in my hands on workshop.
Here are just a few of
the skills you will learn in this unique workshop:
What metals to use in
making this project
Tips on layering multiple
pieces of metals
How to design a custom watchband
How to attach items to rounded
pieces
Cutting and creating
shapes in metal
Filing, fitting and
drilling metal
How to patina and hand
finish your creation
How to include a photo,
if desired
*All levels are welcome*
*All levels are welcome*
KIT FEE - $14 – payable to instructor at class time
and includes
 Metals for band
Brass stamping or filigree
Jump rings
Micro hardware
Lobster claw clasp
Rivet hardware
Polishing pad, patinas, sand papers
Use of many tools and materials
INSTRUCTOR WILL HAVE THE FOLLOWING FOR USE IN CLASS
Texture hammers
Bracelet mandrels
Drills & bits
Templates
Patinas
Punches, files, hammers
Extra hardware
Wood for drilling
Extra metals and jump rings
Sealers, paint brushes
**Watches for purchase - I will have a variety of
some cool watches available for purchase
STUDENT SUPPLY LIST
Metal shears
Heavy wire cutters (Fat Daddy’s if you have them)
Steel block & rag
Rawhide or plastic hammer
 Mini ball peen hammer (2-ounce preferably)
Regular ball peen hammer
Center punch
Flat metal file
Needle metal files
Pliers - flat nose, large round nose, small round
nose
Bracelet benders if you have them
Ruler, pencil, fine tip permanent marker, masking
or painters tape Metal hole punches (if you have them)
Small scissors
 About 2” of small chain
6” of larger chain, (best if open links on the
larger chain)
* Bring some beautiful small stampings, a touch of
this and that, whatever you think might look great on a watchband, and can be
drilled and attached. Thin
attachments are good, and no wider than about 13mm. Metal tags, stampings like
crowns or filigree, a bit of sparkle, old tintypes, photographs, frame
stampings, and so many possibilities.
Just give some thought to the comfort of it on the band while wearing,
as well as capability of attaching.
OPTIONAL
Ott light - battery powered (with lots of
batteries), or plug-in variety with an extension cord
Magnifiers
If you want to add a photo, bring a small one about
½” by ½” wide or so, or to fit a frame stamping you might bring.
*Feel free to bring a watch of your own - You’ll
need one with about a 15-18mm bar opening (band width).
CONTACT
 Join me in this
wonderfully creative, hands-on metals workshop. You will be designing a custom pendant with a soldered bezel
and brass stamping, a darling scallop look, and a dob of rhinestones if you
like. What picture will go inside your bezel? How about a sepia tone of a
relative or loved one? Or you could use a beautiful hand made “Auratone” I will
be providing. These are fabulous
sepia tone photos with a lovely gold background, a process my friend Barbara
Buckles invented. She will be
supplying some Auratones specifically for this workshop. These little works of
art are a blast to make, and have such a special feel to them with their royal
“lace” effect. I can’t wait to
share this with you.
Join me in this
wonderfully creative, hands-on metals workshop. You will be designing a custom pendant with a soldered bezel
and brass stamping, a darling scallop look, and a dob of rhinestones if you
like. What picture will go inside your bezel? How about a sepia tone of a
relative or loved one? Or you could use a beautiful hand made “Auratone” I will
be providing. These are fabulous
sepia tone photos with a lovely gold background, a process my friend Barbara
Buckles invented. She will be
supplying some Auratones specifically for this workshop. These little works of
art are a blast to make, and have such a special feel to them with their royal
“lace” effect. I can’t wait to
share this with you.
 Auratone photos
 Paint, paintbrushes
Website www.RikiJewelry.blogspot.com
SATURDAY
FEBRUARY 7,
2015
9:00 am until
4:00 pm
RIKI SCHUMACHER
QUEEN’S LACE NECKLACE
$145
all-day class
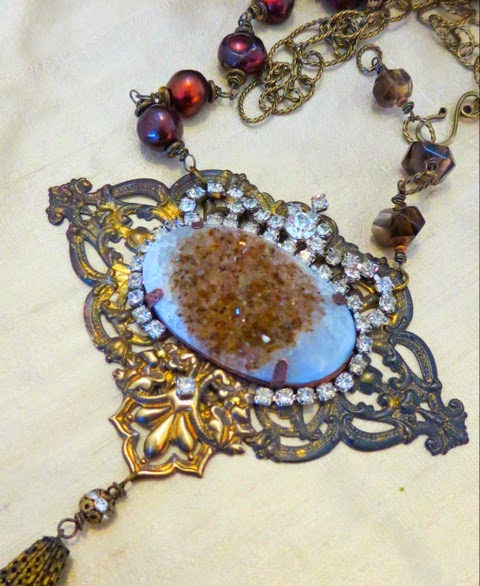
Join me in this
wonderfully creative, hands-on metals workshop. You will be designing a custom pendant with a soldered bezel
and brass stamping, a darling scallop look, and a dob of rhinestones if you
like. What picture will go inside your bezel? How about a sepia tone of a
relative or loved one? Or you could use a beautiful hand made “Auratone” I will
be providing. These are fabulous
sepia tone photos with a lovely gold background, a process my friend Barbara
Buckles invented. She will be
supplying some Auratones specifically for this workshop. These little works of
art are a blast to make, and have such a special feel to them with their royal
“lace” effect. I can’t wait to
share this with you.
Here’s a few of the
wonderful techniques included in the class:
- instruction
on soldering with a micro butane torch
- how
to flood a bezel with solder
- how
to stamp words in to metal
- the
secret of how to solder on rhinestone chain with a micro torch
- how
to make a handmade clasp for your necklace
- techniques
in wiring objects together
- how
to drill for eyelets, then hand set
- how
to cut and file metal
- Riki’s
technique of adding a romantic lace look to metal
- how
to paint angel wings and doo-dads on your photo
- assistance
in design elements of creating your necklace, basic wire techniques
The result is a feast for
the eyes, and fit for a queen!
KIT FEE - $15 –
payable to instructor at class time and includes
Bezels
Auratone photos
Rhinestone chain
Sheet metal
Brass stamping
Patterns for the pendant
Brass wire for a hand made clasp
Resin
Use of many tools and supplies
I WILL HAVE THE FOLLOWING FOR USE IN CLASS
Heat safe surfaces
Some soldering bricks and supplies - flux, solder,
cups, brushes, quench bowls
Extra files
Paint, paintbrushes
Extra jewelry tools
Drills
Patinas, sealers
Sand papers, polishing pads, green scrubbies, paper
towels
Metal alphabet
STUDENT SUPPLY LIST
Micro Butane torch (contact me if you don’t have
one), butane fuel**, soldering brick if you have one, cheap long nose pliers
(Harbor Freight)
** I will have extra fuel for sale at the retreat
for those flying in!
Basic jewelry tools - round nose and needle nose
pliers, flush wire cutters
Files - needle metal files, half round file (medium
to fine)
Small sewing scissors
Steel block
Plastic or leather hammer
1/16” eyelet setting if you have one
Center punch
Metal cutting shears
Vintage objects to add to your necklace, like
beads, buttons, crystals, pearls (with holes big enough for 20ga wire)
20ga wire of some kind to wire necklace together
(copper, brass, bronze or sterling)
Extra bling to add like rhinestone earrings or
brooches
Chain for necklace
Apron, rag, fine tip permanent marker
Mask, if sensitive to fumes
Feel free to bring your own picture of some sort to
use in your pendant, a one-inch circle size. You might want to bring old rhinestone bracelets for the necklace
portion, or old rhinestone bits to add.
OPTIONAL
Ott light - battery powered (with lots of
batteries), or plug-in variety with an extension cord
Magnifiers
Small metal hole punch
CONTACT
 In this metal smith
workshop, you will learn how to make, and incorporate, a tab setting into an
assemblage pendant. Tabs are fun to make, versatile, and just darn gorgeous! So
many things can be tab set like antique items, cabochons, found objects, and
just about anything that is flat on the bottom side. Many items can’t be set in a traditional bezel, and there are
tons of objects that can’t be soldered on to metal due to their fragility. This
method may be used over and over again when you get home, where you can set
those items you’ve been wanting to but didn’t have the know-how.
In this metal smith
workshop, you will learn how to make, and incorporate, a tab setting into an
assemblage pendant. Tabs are fun to make, versatile, and just darn gorgeous! So
many things can be tab set like antique items, cabochons, found objects, and
just about anything that is flat on the bottom side. Many items can’t be set in a traditional bezel, and there are
tons of objects that can’t be soldered on to metal due to their fragility. This
method may be used over and over again when you get home, where you can set
those items you’ve been wanting to but didn’t have the know-how.
 - how
to design a tab setting to fit your object
- how
to design a tab setting to fit your object
 Dremel drills & bits
 Rawhide or plastic flat hammer
CONTACT
Website www.RikiJewelry.blogspot.com
SUNDAY
FEBRUARY 8,
2015
9:00 am until
4:00 pm
RIKI SCHUMACHER
The Tab, Please!
$145
all-day class
In this metal smith
workshop, you will learn how to make, and incorporate, a tab setting into an
assemblage pendant. Tabs are fun to make, versatile, and just darn gorgeous! So
many things can be tab set like antique items, cabochons, found objects, and
just about anything that is flat on the bottom side. Many items can’t be set in a traditional bezel, and there are
tons of objects that can’t be soldered on to metal due to their fragility. This
method may be used over and over again when you get home, where you can set
those items you’ve been wanting to but didn’t have the know-how.
I can’t wait to teach you
how to do a no-solder setting, using sheet metal and cold connections. You will
love introducing this skill in to your bag of tricks.
I hope you join me! I
look forward to sharing this art with you, along with many more techniques!
Here are a few of the
techniques you will learn in this metal smith workshop:
- how
to design a tab setting to fit your object
- how
to add a word or two to your design with metal
- how
to create the setting from scratch
- ways
to texture a tab for more adornment
- arranging
the setting to work with your other design elements
- how
to cut and file metal
- drilling
and filing metals
- the
proper way of “setting” an item into a tab
- how
to patina and hand finish your piece
- incorporating
your work into a custom necklace
*All levels are welcome*
*All levels are welcome*
KIT FEE - $15 –
payable to instructor at class time and includes
Metals
A stamping for a base
Patinas
Polishing cloth
Micro hardware
Use of tools and materials
INSTRUCTOR WILL HAVE THE FOLLOWING FOR USE IN CLASS
Dremel drills & bits
Extra hardware
Extra metal files
Patinas, sand paper, adhesives, polishing cloths
Texturing hammers
A few bench pins for those who need to use a
jewelers saw
* I will bring extra antique photo pins, a few
cabochons, various objects to set, and base plate stampings available for purchase.
STUDENT SUPPLY LIST
Metal shears
Files - needle metal files, standard metal files
Steel block & rag
Item to tab-set like an antique photo pin or
cabochon (1” to 1-¼” wide and tall if
you use my optional base stamping. You can use an item larger too, but no
larger than about 1-¾”.)
Rawhide or plastic flat hammer
Jewelry tools - fine nose pliers, flat nose pliers,
round nose pliers, flush cutters, ruler, paper, pencil
Extra objects to add to pendant - can be vintage or
modern
Any bling you might want to add anywhere
Items to wire into your necklace and 20ga wire for
that
OPTIONAL
Ott light - battery powered (with lots of
batteries), or plug-in variety with an extension cord
Magnifiers
If you are setting an item smaller thank one inch,
you will need to bring a jewelers saw and #3/0 or #4/0 saw blades. (I will have
a few on hand too.)